|
TICT TUTORIAL SERIES 2 - Part II
| (c) TI-Chess Team 2001 |
|
The Magic Of Raycasting
|
Focus Of This Series
As promised a long time ago I have started now a second Tutorial Series about
advanced TIGCC Programming Topics. The new Series aims to intermediate and
advanced TIGCCC programmers. If you have just started coding in C or if you are
not comfortable with the TIGCC Environment, I suggest that you start first
reading the first Tutorial Series which can be downloaded at
http://www.ticalc.org/archives/files/authors/32/3274.html. The second
Series is definitely NOT for beginners.
If you don't understand something in this Series please use the TIGCC Programming Forum at
http://pub26.ezboard.com/btichessteamhq
to ask your questions. and don't mail to me directly. Every day I get more than
a dozen mails and it cost me too much time to answer all of them (nevertheless
bug reports or positive feedback is very welcome in any form).
Software used to produce this Series:
Focus Of This Tutorial
This tutorial focus on the technique behind Raycasting as used in the lately released
FAT-Engine. This tutorial will come without any real sourcecode to look at, but it
explains at least the basic ideas. A real implementation of these ideas will become
available whenever I'll finish the FAT-Engine (I'll hope in a few weeks).
The World of a Raycasting Engine
The World in which a Raycasting Engine lives, is very simple. It consists of equal-sized
squares like in the picture below (the world is refered later on as "the Map"):
World of A Raycasting Engine seen from above |
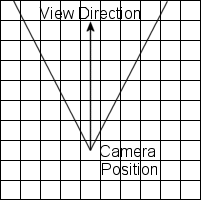 |
You can think of the Raycasting Engine as form of a camera which is located somewhere on
this map (camera position) and which "looks" in a specific direction (camera orientation). How much
of the map is visible depends on the viewing angle (field of view). A "normal" human-like viewing
angle is 60 degrees from left to right as shown in the picture above.
To make things simple we suppose that each square has a side length of 64, so we have 64*64
possible positions within each square which is enough for our purposes.
Each of the squares holds a cube which is either empty or filled. When it is filled the cube is textured
on all sides with a given texture. This way a map can be defined in a program like this:
#define MAP_WIDTH  8
#define MAP_HEIGHT 8

// 0 ... empty
// 1 ... solid - using texture 1
// 2 ... solid - using texture 2

unsigned char map[MAP_WIDTH*MAP_HEIGHT]={
1,1,1,1,1,1,1,1,
1,0,0,0,0,2,0,1,
1,0,1,0,0,2,0,1,
1,0,1,0,0,2,0,1,
1,0,1,0,0,2,0,1,
1,0,1,0,0,2,0,1,
1,0,0,0,0,0,0,1,
1,1,1,1,1,1,1,1};
How a Picture is generated By a Raycasting-Engine
The picture below shows an example of a screen generated by the FAT-Engine. The FAT-Engine
uses a square screen format of 96*96 pixels.
| Looking down the Street |
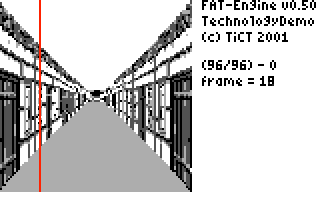 |
In the above picture I have marked one column. The algorithm which is used by raycasting engines to generate
the view is column based. For each column one ray is fired into the map in the corresponding direction and for
each square this ray hits the engine looks if it is filled or not. If it is not filled it proceeds along this
ray to the next hit square and examines the "value" of this square again. If it hits a solid square the procedure
stops and retrieves the column index of the texture it hits. The height to which this texture column has to be
scaled is simply calculated from the distance between the camera position and the intersection point.
This method of casting rays on a 2-dimensional map can be performed with some tricks very fast, but the
drawing of the scaled texture columns limits the speed to a certain point (due to the fact that 8 pixels are
packed into one byte on the TI89/TI92p).
Used Trigonometric Functions
Raycasting uses just simple trigonometric functions. All used functions are listed here
(the given ranges for x and y are the window settings used to generate the pictures):
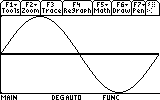
sin(x)
0 <= x <= 360 degrees
-1.0 <= y <= 1.0 |
 |
cos(x)
0 <= x <= 360 degrees
-1.0 <= y <= 1.0 |
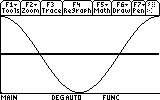 |
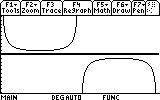
1.0/sin(x)
0 <= x <= 360 degrees
-10.0 <= y <= 10.0 |
 |
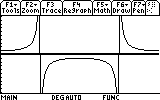
1.0/cos(x)
0 <= x <= 360 degrees
-10.0 <= y <= 10.0 |
 |
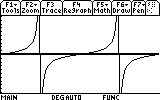
tan(x)
0 <= x <= 360 degrees
-10.0 <= y <= 10.0 |
 |
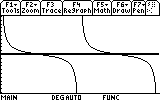
1.0/tan(x)
0 <= x <= 360 degrees
-10.0 <= y <= 10.0 |
 |
How to perform Fast Trigonometric Calculations
Normally trigonometric functions are evaluated as floating point numbers. Using floating point
calculations may work on a modern 800MHz PC, but on a TI-89/TI-92p they are much too slow to be used
in a raycasting engine until you can wait a few seconds for each picture to "arrive".
There are exactly two methods how to speed up these calculations. The first one is to pre-calculate
the values of the trigonometric functions for each angle and to store this precalculated values in tables
like:
double sintab[360] = {
   // 360 values of sin(x) goes here ...
}
This way we can eliminate the slow function evaluation. If we need the sinus value of, let's say, 135 degrees we
just look the value up in this table instead of calculating it at runtime.
If you examine the pictures of the used functions in detail you may see that we don't need really 360 table entries.
90 entries are completely enough (the values of the first quadrant). The values of the other three quadrants
can be simply evaluated by inverting or reversing the order of the entries in the first quadrant.
This "symmetric" quality of the used functions is very handy, because it let us save much space. And we can save even more
space. We know from school or see from the above pictures that sin(x) and cos(x) are almost the same functions. The cos(x)
function is just moved 90 degrees to the left. The same holds true, of course, for the 1.0/sin(x) and 1.0/cos(x) functions.
When we sum up the necessary space we will need now 4 tables with 90 entries which are 360 values in difference to
2160 (=6*360) entries without using the "symmetric" quality. Not bad, I think, isn't it?
The second optimization trick is that we will not use floating point numbers at all. Even with lookup tables we
would wait seconds until a new picture is calculated, which is not acceptable for a raycasting engine.
Depending on the necessary precision we multiple the original value with a certain number and store the result as signed
integer. The values of the sin(x) table are, for example, multipled by 128. This let us store the values simply
like this:
char sin128tab[90] = {
  // 90 values of 128.0*sin(x) goes here
}
To calculate now, let's say, 234*sin(10) we will calculate 234*sin128[10] and divide the result by 128 what can be quickly
performed by shifting the result 7 bits to the right ((234*sin128[10]) >> 7). Well, that's all about how to perform
trigonometric fast ...
Calculating Intersections with a Regulary Grid
Take a piece of paper with a regulary grid (squares) on it. Now draw a line at any angle and examine the intersections
of the line with the grid. Do you see something special which can be used to speed up the calculations (hint: examine
the intersections with horizontal grid lines and vertical grid lines separately)?
I think you guessed it. Starting from the first intersection with a horizontal grid line the distance to the
intersection with the next horizontal grid line is always constant! This holds also true for the intersection with
the vertical grid lines. If we examine these two types of intersections separately we can very quickly step along the
ray to the next square which is hit. After we've found an intersection with a non-empty square for the vertical and the
horizontal intersection we compare the distances to these squares and take the shorter one for drawing.
Due to the "symmetric" quality of the trigonomic functions the calculations have to be performed slighty different
depending for which of the four quadrants they are performed (different signs). Below you can some code from the FAT-Engine's
sources which setups all necessary variables for the intersection calculations for the first quadrant which ranges from 0 to
89 degrees.
    // code excerpt from FAT-Engine ...

    //----------------------------------------
    // intersection with first horizontal line
    //----------------------------------------
    short   horizontal_x;
    short   horizontal_y;
    //---------------------------------------------------------------
    // just add the following values to horizontal_x and horizontal_y
    // to proceed to the next horizontal intersection
    //---------------------------------------------------------------
    short   horizontal_step_x;
    short   horizontal_step_y;
    //----------------------------------------
    // intersection with first vertical line
    //----------------------------------------
    short   vertical_x;
    short   vertical_y;
    //---------------------------------------------------------------
    // just add the following values to vertical_x and vertical_y
    // to proceed to the next vertical intersection
    //---------------------------------------------------------------
    short   vertical_step_x;
    short   vertical_step_y;

    long    first_hit;  // temporary variable

    //=====================================================================
    // angle 0 to 89 degrees - parameter setup ...
    //=====================================================================
    if (angle < ANGLE_090) {
        //-----------------------------------------------------------------
        // setup parameters for intersections with horizontal lines
        //-----------------------------------------------------------------
        horizontal_y = (ypos & 0xffc0) + 64;
        first_hit    = (long)tab_div_tan[angle]; // 256/tan(angle)
        first_hit   *= (long)(horizontal_y - ypos);
        first_hit   >>= 8L;
        first_hit   += (long)xpos;

        horizontal_x = (short)first_hit;

        horizontal_step_x = tab_xstep[angle];  // 64/tan(angle)
        horizontal_step_y = 64;

        //-----------------------------------------------------------------
        // setup parameters for intersections with vertical lines
        //-----------------------------------------------------------------
        vertical_x  = (xpos & 0xffc0) + 64;
        first_hit   = (long)tab_tan[angle]; // 256*tan(angle)
        first_hit  *= (long)(vertical_x - xpos);
        first_hit   >>= 8L;
        first_hit  += (long)ypos;

        vertical_y = (short)first_hit;

        vertical_step_x = 64;
        vertical_step_y = tab_ystep[angle];  // 64*tan(angle)
    }

    // other quadrants are treated similiar ...
Raycasting - The Algorithm
//----------------------------------------------------------------------------------
// squares are 64x64 in size !!
//----------------------------------------------------------------------------------
for (ray=camera_orientation - ANGLE_030; ray < camera_orientation + ANGLE_030; ray++) {
   setup_intersection_params();

   //----------------------------------------------------------------------
   // find nearest horizontal intersection ...
   //----------------------------------------------------------------------
   while (1) {
        if (horizontal_x < 0 || horizontal_x > (MAP_WIDTH>>6)-1 ||
            horizontal_y < 0 || horizontal_y > (MAP_HEIGHT>>6)-1)
        {
            //-------------------------------------------------------------
            // We ran out of the map. Set hit distance to maximum and break
            //-------------------------------------------------------------
            horizontal_hit_dist = MAX_DISTANCE;
            break;
        }
        else if (horizontal_map_content = *(map+(horizontal_x<<6)+(horizontal_y<<6)*MAP_WIDTH)) {
            //-------------------------------------------------------------
            // We found a non-zero square. Calculate distance and break
            //-------------------------------------------------------------
            horizontal_hit_dist = abs(camera_y - horizontal_y)*sin(ray);
            break;
        }
        else {
            horizontal_x += horizontal_stepx;
            horizontal_y += horizontal_stepy;
        }
   }

   //----------------------------------------------------------------------
   // find nearest vertical intersection ...
   //----------------------------------------------------------------------
   while (1) {
        if (vertical_x < 0 || vertical_x > (MAP_WIDTH>>6)-1 ||
            vertical_y < 0 || vertical_y > (MAP_HEIGHT>>6)-1)
        {
            //-------------------------------------------------------------
            // We ran out of the map. Set hit distance to maximum and break
            //-------------------------------------------------------------
            vertical_hit_dist = MAX_DISTANCE;
            break;
        }
        else if (vertical_map_content = *(map+(vertical_x<<6)+(vertical_y<<6)*MAP_WIDTH)) {
            //-------------------------------------------------------------
            // We found a non-zero square. Calculate distance and break
            //-------------------------------------------------------------
            vertical_hit_dist = abs(camera_x - vertical_x)*cos(ray);
            break;
        }
        else {
            vertical_x += vertical_stepx;
            vertical_y += vertical_stepy;
        }
   }

   //----------------------------------------------------------------------
   // compare distances and draw vertical wall strip ...
   //----------------------------------------------------------------------
   if (horizontal_hit_dist <= vertical_hit_dist) {
       // use horizontal intersection
       wall_height    = SOME_SCALE_VALUE / horizontal_hit_dist;
       texture_index  = 64 - (horizontal_x & 0x3f);
       DrawStrip(wall_height,horizontal_map_content,texture_index);
   }
   else {
       // use vertical intersection
       wall_height    = SOME_SCALE_VALUE / vertical_hit_dist;
       texture_index  = vertical_y & 0x3f;
       DrawStrip(wall_height,vertical_map_content,texture_index);
   }
}
Looks simple, is simple. The only thing we have to take additionally care of is
the handling of the 4 different squares. The above distance calculation is also
a little bit simplified. It depends on the actual angle if sin(x) or cos(x) should be
used.
Useful Resources about Raycasting and Game Programming In General
http://cg.cs.tu-berlin.de/~ki/engines.html
The 3D Engines List tries to provide an overview of software 3D engines for realtime graphics and VR on various platforms. Each engine is reviewed with list of features, contact information (email, link to homepage) and links to download a demo or the source.
http://www.programmersheaven.com
Very code resource for any programming related topic (many sourcecodes can be found here)
http://www.gameai.com
Artificial Intelligence (AI) related articles can be found here
http://dir.yahoo.com/Recreation/Games/Computer_Games/Programming
Link list to many game programming related sites
... And The Credits go to:
Contact TI-Chess Team Members
Check the TICT HQ Website at http://tict.ticalc.org for more
tutorials and software.
More useful tips, tricks and hints can be found at our Messageboard at:
http://pub26.ezboard.com/btichessteamhq.
Suggestions, bug reports and similar are VERY welcome (use our Messageboard for this!!).
How to Thanx the Author?
Like Xavier from the Doors Team I like it to get postcards from all over the world.
If you want to thank me, just send me an postcard with greetings on it. Thats enough.
My address is:
Thomas Nussbaumer
Heinrichstrasse 112a
A-8010 Graz
Austria
... and please: no mail bombs if one of my programs had crashed your calculator!
(6) Copyleft
This program may be distributed by any other website for non-commercial use only.
DISTRIBUTIONS ON ANY OTHER MEDIUM (Disc,CD-ROM,DVD etc.) are PROHIBITED without separate allowance of the author.
The author makes no representations or warranties about the suitability of the software and/or the data files, either express or implied.
The author shall not be liable for any damages suffered as a result of using or distributing this software and/or data files.
You are free to re-use any part of the sourcecode in your products as long as
you give credits including a reference to the TICT-HQ (http://tict.ticalc.org/).
Thomas Nussbaumer Graz,Austria 05/04/2001


